|
|
Skinning iTunes by George Krueger If you've been wanting to create your own iTunes makeover, or "skin," but didn't know where to start, then this tutorial is for you. Here's what you will need to get started:
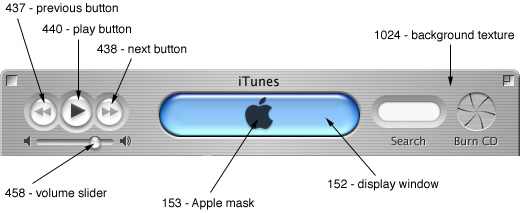
Since we will be dealing only with the PICT resources of iTunes, lets get acquainted with some of primary resources you will be concerned with. Open iTunes in ResEdit and take a look at the following PICT resources:
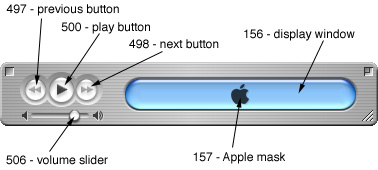
Here are some of the equivalent resources for the minimized view of iTunes:
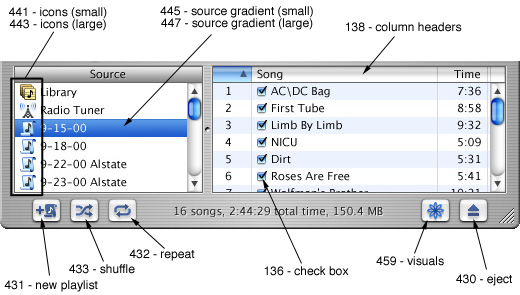
And some of the resources that appear in the main part of the window:
These are some of the major components you may want to alter. Of course there are many others, so feel free to look around. Most of the components also have corresponding "masks", which I'll discuss later. Use ResEdit to open and copy the PICT resource from iTunes and paste it into your graphic editor. Let's start with the background texture, PICT id # 1024. The main thing to keep in mind is that this resource will be tiled to fill the window, so make sure that you use a pattern that tiles well (by this, I mean you should make sure that the edges match up on all sides). If you use Photoshop, you can use the offset filter to help you with this. Try setting the filter for 10 pixels right and 10 pixels down with "wrap around" enabled, then edit it so that there are no "seams." I've chosen a simple striped background for the above example, which tiles well, but there are many possibilities. For this "wooden" background, I had to pay more attention to the edges:
Another thing to point out is this resource will only display in grayscale. As far as I know, no one has figured out how to display the main window in anything but grayscale. (If someone knows of a way to add color to the window, please let us know!)
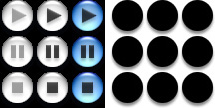
And some can also change, like the Play button:
If you change the shape of any of these buttons, be sure you change its mask. Be aware that some resources share the same mask. For instance, both the previous and next buttons (ID's #437 & #438, respectively) use the same mask (id #436), so they will always have to be the same shape. Pay close attention to which masks go with which buttons.
This is a nice effect. Try playing around with the masks for the buttons as well.
For the previous/play/next buttons, you can also accomplish this by replacing the mask with a plain white image. Do not, however, just delete the mask. Also, don't try this approach for the "search well", the result is undesirable.
|
|||


|
||||||||||||||||||||||||||||||||
Maintained by the Staff of ResExcellence. This entire site ©1997-2006 ResExcellence
Privacy Statement? Sure we gotta Privacy Statement.
[an error occurred while processing this directive]