
Articles 3D Audio Custom Controls General RB Graphics Hacks Mac OS X Menus Novelty Printing REALbasic 2005 REALbasic 2006 Registration Resources Reviews Serial Speech Sockets XML Video Resource Links News Current News February 2006 January 2006 December 2005 November 2005 October 2005 September 2005 August 2005 July 2005 June 2005 May 2005 April 2005 March 2005  REALbasic for Dummies by Erick Tejkowski  Learning REALbasic through Applications REALbasic for Macintosh REALbasic Cross-Platform Application Development 
Older files are in Stuffit 5 or greater format. Newer files are ".Zip". Download StuffIt Expander |
|

As a ResExcellence reader, you probably already know how cool Macintosh resources are. All sorts of information can be stored in resources, including text, icons, cursors, audio, and even graphics. This tutorial shows you how to extract 'PICT' resources from your favorite application and save them to disk in a more useable format - a PICT file. Create the Interface Launch REALbasic and open Window1, the default window found in each new project. Drag the following controls from the toolbar into the interface:
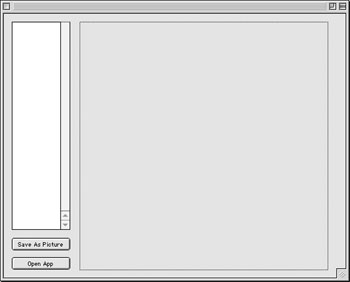
If you haven't guessed already, this project will allow a user to choose any application and display the 'PICT' resources contained within. Thereafter, the user can save any of the 'PICT' resources as 'PICT' files. Define the Properties You are going to need access to two important pieces of information throughout the code:
Since you want access to these pieces of information throughout your code, you must declare these properties local to the window. To do so, double-click Window1 to open its Code Editor. Next select Edit->New Property and add a new property: f as FolderItem Next, add a Picture property: p as Picture By now, your Code Editor should look something like this: 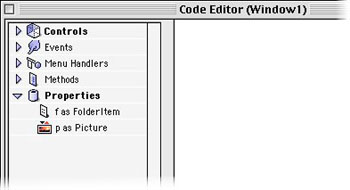
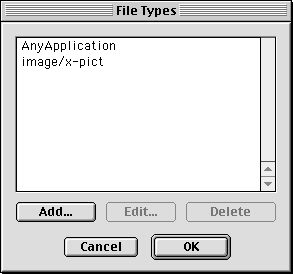
Declare File Types Now, before we go crazy adding code to the interface, we need to do one last bit of preparation. In this example, we want to give the user an opportunity to choose an application and later to save a 'PICT" file. By default, your application doesn't know anything about these two types of files. You have to describe them for your application to "know" what they are. To do so, select Edit->File Types and add the two file types pictured below: AnyApplication: Describes what an application "looks like" to your application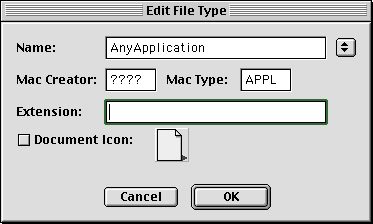 image/x-pict: Describes what a 'PICT' file "looks like" to your application image/x-pict: Describes what a 'PICT' file "looks like" to your application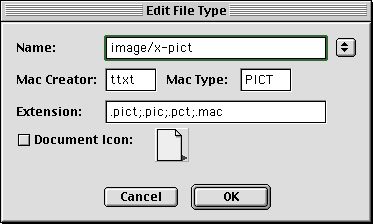
When you're finished adding the two file types, your File Types dialog should look like this: Add the Code Now, it's time to add some code. First off, double-click PushButton1 and add the following code: dim rf as ResourceFork Next, open the Change event of Listbox1. To this event, add the following code: dim rsrcnumber as integer To make the picture display, add the following code to the Paint event of Canvas1. if p<>nil then The final coding step shows you how to save the Picture (p) to an external file. Open the Action event of PushButton2 and add this code: dim PictureFile as FolderItem Test and Build the Application There! That wasn't too tough, was it? To test your masterpiece, select Debug->Run. when you are convinced it is error free, select File->Build Application to build the final version. Since you will be opening 'PICT' resources with this application and 'PICT' resources can be potentially large, make sure to give the application a healthy RAM size for Mac OS 8/9 use. As usual, you can also download: |
||||


|
||||||||||||||||||||||||||||||||
Maintained by the Staff of ResExcellence. This entire site ©1997-2006 ResExcellence
Privacy Statement? Sure we gotta Privacy Statement.
[an error occurred while processing this directive]