
Articles 3D Audio Custom Controls General RB Graphics Hacks Mac OS X Menus Novelty Printing REALbasic 2005 REALbasic 2006 Registration Resources Reviews Serial Speech Sockets XML Video Resource Links News Current News February 2006 January 2006 December 2005 November 2005 October 2005 September 2005 August 2005 July 2005 June 2005 May 2005 April 2005 March 2005  REALbasic for Dummies by Erick Tejkowski  Learning REALbasic through Applications REALbasic for Macintosh REALbasic Cross-Platform Application Development 
Older files are in Stuffit 5 or greater format. Newer files are ".Zip". Download StuffIt Expander |
|

Back in the late 1970's, Parker Brothers introduced a great handheld electronic game machine called Merlin. Merlin played six different games that, while crude compared to today's gizmos, could hold a kid's interest for hours on end (trust me on this one). This week, we will begin with Part 1 of a multi-part REALbasic tutorial to build a Merlin simulator. Background If you aren't familiar with the Merlin game, perhaps a good place to start is with a little background information. The web holds a wealth of Merlin goodies, from photographs of the machine to descriptions of its functionality. To get a sense of how the machine worked, check out some of these links:
Merlin was a popular game with kids (in reality, pretty much any handheld electronic device was popular... much like today). Merlin was special though, because it played many more games than other popular machines of the era and, despite its foot-long enclosure, was fairly portable. (For some perspective, it was a tad longer than a Newton and a bit narrower.). Create the Interface Since our Merlin Simulator project is somewhat involved, we are going to break it up over several weeks. This week, we'll focus on creating the interface. Next week, we'll begin adding functionality to the simulator. Your first step in creating the Merlin interface will likely begin with a graphics application. Use whatever is handy to create 'PICT' files for the following interface elements:
If you aren't handy with graphics or simply don't have the time to create them, don't fret. You will get a chance to download the completed project, which has taken care of the dirty work for you. Once you have some graphics, drag them into the Project Window. Next, open Window1 and add the following controls to the window:
If you are following along, your interface might look like this (Note! Canvas1 occupies the entire size of the window and is behind all of the buttons): 
Next, download these button classes and drop them into your project. The classes are named NumButtonClass and UtilButtonClass. Once you have added them to the project, change the Super property of each NumButton to NumButtonClass and the Super property of each UtilButton to UtilButtonClass. If you download the completed project at the end of this tutorial, you needn't download the button classes (they are included in the final project). The separate download of the classes is meant strictly as a convenience to you should you wish to follow along and build the project. In case you are wondering how these classes work, check out this previous ResEx tutorial. This week's custom classes work in a similar fashion. When you've finished constructing the interface, select Debug-Run to see your handiwork. If all goes well, it shouldn't look too much different than the previous interface image. It will act differently, though. When you press the buttons in the interface, the Number buttons will change to red when pressed and the Utility buttons will also behave like buttons, dimming when depressed. 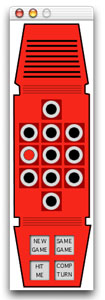
Conclusion Well, that's it for this week. We covered a lot of preliminaries. Next week, we'll start looking at some code to make the Merlin Simulator actually do something. And, as promised, you can download the completed project and demo applications. See you next week! |
||||||||||||


|
||||||||||||||||||||||||||||||||
Maintained by the Staff of ResExcellence. This entire site ©1997-2006 ResExcellence
Privacy Statement? Sure we gotta Privacy Statement.
[an error occurred while processing this directive]