In this week's REALbasic tutorial, we'll take a look at how to create a Listbox that mimics those pretty blue-and-white lists in iTunes.
Build the Interface
This week's project is very straightforward. It will take you about 30 seconds to build, but it shows some important features of the REALbasic Listbox. So, let's get started!
Launch REALbasic and open Window1 from the Project window. To this window, add one control - a Listbox. Set ColumnCount to a value of 3 in the Properties Window.
That's the whole interface!
Source Code
The source code for this week's project is simple too. First, we need some code in the Open event of Listbox1. This code snippet adds 20 rows to the Listbox upon launch.
dim i as integer
for i=1 to 20
me.addrow "Row "+str(i)
me.cell(me.lastIndex,1)=str(rnd*10)
me.cell(me.lastIndex,2)=str(rnd*30)
next
Next, navigate to the CellPaint event of Listbox1 and add this code:
//fill in even numbered rows
//with light blue color
//odd rows get no color (i.e. white)
if (row mod 2)=0 then
g.foreColor = rgb(232,235,255)
g.fillrect 0,0,g.Width,g.height
end if
//if selected,
//fill in row with dark blue color and white text
//otherwise draw with black text
if me.selected(row) then
g.foreColor = rgb(66,82,255)
g.fillrect 0,0,g.Width,g.height
g.foreColor = rgb(255,255,255)
else
g.foreColor = rgb(0,0,0)
end if
//draw the string
g.drawstring me.cell(me.lastIndex,1),0,0
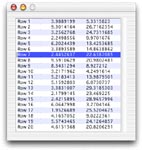
This code does the colorizing of the rows, including the selection. The graphics object represents the background of the Listbox. You can use it to draw just like you would in a Canvas. The end result looks like this:

Conclusion
To test the project, select the Debug-Run menu. Even though this project is super simple to create, you can download the completed version instead if you prefer. Have fun and see you next week!