image ResEx Logo
ResExcellence www : Powered by Google
Cell Phone Themes Icons Mighty Mouse Cursors Software Reviews Widgets & Widgets

Articles
   3D
   Audio
   Custom Controls
   General RB
   Graphics
   Hacks
   Mac OS X
   Menus
   Novelty
   Printing
   REALbasic 2005
   REALbasic 2006
   Registration
   Resources
   Reviews
   Serial
   Speech
   Sockets
   XML
   Video
Resource Links
News
   Current News
   February 2006
   January 2006
   December 2005
   November 2005
   October 2005
   September 2005
   August 2005
   July 2005
   June 2005
   May 2005
   April 2005
   March 2005


REALbasic for Dummies
by Erick Tejkowski


Learning REALbasic through Applications
by Clayton E., Crooks II


REALbasic for Macintosh
by Michael Swaine


REALbasic Cross-Platform Application Development
by Mark S. Choate


Older files are in Stuffit 5 or greater format. Newer files are ".Zip". Download StuffIt Expander
Tell us about a bad link. Thank You!

Cropping Graphics Part 2 by Erick Tejkowsi
02-14-03

Printer Version


This week we continue with out multi-part tutorial about cropping graphics with REALbasic. These tutorials will cover the basics of how to implement click-and-drag graphics selection and cropping, like you'll find in most popular graphics applications. This week we'll add a splash of color and delve into transparent graphics.

The tutorial emulates a Cocoa project available from Apple. As we progress through the project each week, we'll add various features to mimic the original Apple example. So, go check out the original code and come back here ready for some REALbasic coding. NOTE: This demo is made with OS X in mind.

Augment the Interface
Launch REALbasic and open a copy of last week's project. Add a PopupMenu control to Window1. Click the Edit button in the InitialValue property of PopupMenu1 in the Properties window. In the dialog that appears, add the following words (each on its own line): Red, Green, Blue. You can position the control anywhere in the window that you want. Here's what mine looks like.

02-14-03_img2.jpg (18k)

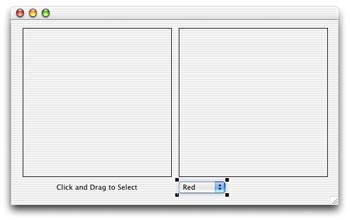
That's it for the interface enhancements, so let's move on to the code.

Add the Code
Double-click the Window Editor of Window1 to open the Code Editor. Choose Edit-New Property and create one new property.

  • pictureMask as picture
This new Picture property will be where we we draw a colored mask. We will incorporate that mask into the drag, which will allow us to colorize the selection.

Next, choose Edit-New Method and create a new method named: DrawMask. As you might have guessed, this method will draw the mask picture. First, the code selects a color based on the Popupmenu1 selection. Then, it fills in the Picture with a solid rectangle. Finally, using the Mask property of the Picture object, the code fills in the Picture with a transparent rectangle. ( using RGB(192,192,192) )

  pictureMask = newpicture(canvas1.width,canvas1.height,32)
  select case popupMenu1.listindex
  case 0
    //red
    pictureMask.graphics.foreColor = rgb(255,0,0)
  case 1
    //red
    pictureMask.graphics.foreColor = rgb(0,255,0)
  case 2
    //blue
    pictureMask.graphics.foreColor = rgb(0,0,255)
  end select
  pictureMask.graphics.fillrect 0,0,canvas1.width,canvas1.height
  pictureMask.mask.graphics.foreColor = rgb(192,192,192)
  pictureMask.mask.graphics.fillrect 0,0,canvas1.width,canvas1.height

Add this code to the Open event of Window1 initialize the new Picture:

  //prepare Mask image
  DrawMask

Then, add the same code to the Change event of PopupMenu1 to change the mask when the user selects a new color:

  //PopupMenu1.Change
  DrawMask

Next, change the existing code in the MouseDrag event of Canvas1 to track the drag operation using the new mask:

  //Canvas1.MouseDrag
  dim g as graphics
  g=pictureSrc.graphics
  if lastx<>x OR lasty<>y then
    lastX = X
    lastY = Y
    g.foreColor=rgb(200,200,200)
    g.drawpicture scenery,0,0
    g.drawrect startX,startY,lastX-startX,lastY-startY
    g=me.graphics
    g.foreColor=rgb(200,200,200)
    g.drawpicture scenery,0,0
    if startX<lastX and startY<lastY then
      g.drawrect startX,startY,lastX-startX,lastY-startY
      g.drawpicture pictureMask,startX+1,startY+1,lastX-startX-1,lastY-startY-1
    elseif startX>lastX and startY>lastY then
      g.drawrect lastX,lastY,startX-lastX,startY-lastY
      g.drawpicture pictureMask,lastX+1,lastY+1,startX-lastX-1,startY-lastY-1
    elseif startX>lastX then
      g.drawrect lastX,startY,startX-lastX,lastY-startY
      g.drawpicture pictureMask,lastX+1,startY+1,startX-lastX-1,lastY-startY-1
    elseif startY>lastY then
      g.drawrect startX,lastY,lastX-startX,startY-lastY
      g.drawpicture pictureMask,startX+1,lastY+1,lastX-startX-1,startY-lastY-1
    end if
  end if

That's it! Choose Debug-Run to test your work. Click and drag in the image on the left side of the window to view a cropped version on the right side.
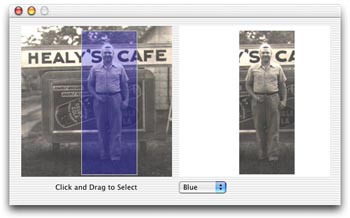
02-14-03_img1.jpg (22k)

Conclusion
You can download the completed project here. We'll continue adding features to the project next week. See you then!


Cell Phone Themes Icons Mighty Mouse Cursors Software Reviews Widgets & Widgets

Maintained by the Staff of ResExcellence. This entire site ©1997-2006 ResExcellence
Privacy Statement? Sure we gotta Privacy Statement. [an error occurred while processing this directive]