Fast User Switching
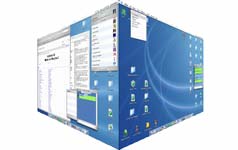
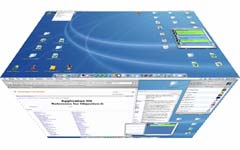
In Mac OS X 10.3, we were blessed with the new Fast User Switching feature allowing multiple simultaneous user logins. While Microsoft or other OS manufacturers (like there are any) would have simply made a normal "switch" between the two users or maybe a fade if they were feeling fancy, Apple had to do something no one had ever seen before and came up with the crowd-please "cube" effect.
 |
 |
|
Fast User Switching
|
REALbasic Cube3dSpace
|
Some months ago (on my birthday as a matter of fact), Thomas McGrath on the REALbasic NUG mailing list asked how he could get the same kind of cube effect to swap images in and out of a canvas. In about an hour and a half, I came up with the basics for the 3d cube effect. I admit, it was not perfect and I was going off of some random guesses to make it worked, but the idea was there. Kevin Ballard soon after took the project I posted and spent the time to figure it out and posted his version on the web.
While the version he posted literally only rotated a cube, the code he had written was better formatted. There is a difference to note here; if the face of the screen was literally rotated as if it was on a cube, the corners of the cube would extend beyond the bounds of the screen. The Fast User Switching effect actually makes the corners of the cube slide along the bounds of the screen. It's a bit hard to explain, but the latter looks far better, which is the reason Fast User Switching does it.
The project here today is a modification of Kevin's project, rewritten to actually perform the Fast User Switching animation (his original project did a literal rotation), and was reorganized to be easier to use. With a one call to a single method - Run(FaceImage, SideImage, Direction, Duration) - you've got a cube effect in your application.
Design and Use
To get the cube effect in your application, all you have to do is download the project here and use the prebuilt Cube3dSpace class. Cube3dSpace is a subclass of the RB3dSpace control, so this means you'll have to drag one out onto the window to use it. From there, all you have to do is tell the Cube3dSpace which direction you want the cube to rotate and which images to use.
In this project we simply use the KeyDown event of the window to determine which way we're going rotate, but interpreting the presses of the arrow keys. First we figure out how long we want the animation to take. Normally one second is about right, but if we want to be fancy, we can let the user hold the shift key to slow it down, much like minimizing a window, opening a folder, or selecting a window from Exposé.
After that, we need to figure out which image is currently in the front. There's a window property, ImageFront as integer, which if 1 means that the "PicScreen1" image is currently visible on the front face of the cube, and if it is 2, it means "PicScreen2" is on the front. The "SideImage" parameter (the second parameter) to the Run method in Cube3dSpace is the image which will be rotated to the front. So in the case of pressing the left arrow key (Case 28), the image "Image2" is on the left side of the cube, and when we rotate the image, the left side of the cube comes to be the front.
Function KeyDown(Key As String) As Boolean
dim image1, image2 as Picture
dim duration as double
// Slow it Down?
if Keyboard.AsyncShiftKey then
duration = 3.0
else
duration = 1.0
end if
// Pick the Images
if ImageFront = 1 then
image1 = PicScreen1
image2 = PicScreen2
ImageFront = 2
else
image1 = PicScreen2
image2 = PicScreen1
ImageFront = 1
end if
// Run the Animation
Select Case Asc(Key)
Case 28
Cube3dSpace1.Run image1, image2, Cube3dSpace.kDirectionRotateLeft, duration
Case 29
Cube3dSpace1.Run image1, image2, Cube3dSpace.kDirectionRotateRight, duration
Case 30
Cube3dSpace1.Run image1, image2, Cube3dSpace.kDirectionRotateUp, duration
Case 31
Cube3dSpace1.Run image1, image2, Cube3dSpace.kDirectionRotateDown, duration
end Select
End Function
Note that we also allow you to rotate the cube vertically. A special treat just for you! Also note, that this project will work on any platform Quesa runs on. If you have no idea what Quesa is, visit Quesa.org and read look on the REAL Software webpage for more information about REALbasic & Quesa.
Finished
Feel free to look at the actual code for the Run method in Cube3dSpace. It is definitely not for the novice, but it's not extremely difficult to understand as long as you've looked at or worked with 3d in REALbasic before. I've tried to design the class specifically so that you never have to know how it works, but if you wanna know, it's a great way to learn. As always, you can download the project here.